Accessories Menu
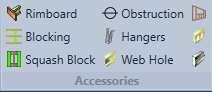
Rimboard

Rimboard is used to close off a floor or a roof system with engineered wood it is required to have lateral support at bearing ends of an I-joist. This helps prevent rotation of the joist. Rimboard is also used for closing off a stairwell; for example between first and second floor walls.
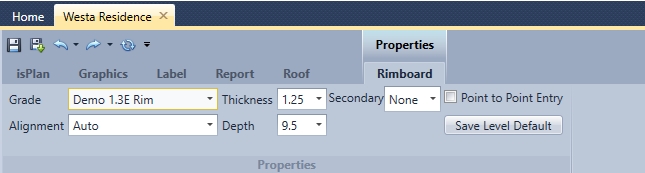
Grade- Users select the grade of the rim product they would like to use. It can be OSB rim, LVL rim, or Solid Sawn rim.
Alignment - defaults to Auto (and works very well with Auto Rim input method) and users can still select: center, left, right as alignment as well.
Thickness - users can access the thickness with the drop-down menu. Predefined by the actual product file.
Depth - users can access the depth of the rim from the drop-down menu. Predefined by the actual product file.
Secondary Rimboard- uses can select another piece of rimboard. This will add as secondary piece to the initial rim and will act as two separate pieces working independent of each other.
Point to Point Entry - Pick the beginning point and the end point of the rimboard location users want to describe. If turned off point to point it will go along any selected line.
Save Level Default - Saves all the rimboard properties with that specific job in that specific level. Restarting or exiting the program will lose that default.
Blocking

Blocking is used to stabilize a framing member to help prevent excessive load transferred from above, rotation of members and just additional support of the diaphragm.
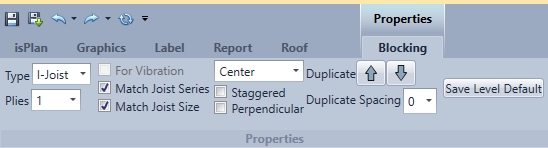
Type: Users select from the drop-down for the type of product they would like to use for the blocking. This can include I-joist, LVL, Lumber, Glulam and Rimboard.
Plies: Users select from the drop -down the number of plies of blocking they want to use.
For Vibration - Turn on vibration to meet vibration criteria for Canada. The vibration floor performance can be increased by adding blocking in the middle of the span or at a specific distance along the span or 2 or more blocks per spans. Some might use vibration in United States for a better performing floor system; but it is not a requirement for building in the USA.
Match Joist Series: Click on match joist series to match whichever joist is being used where the blocking is to be inserted. This will match the product series or type that has been used.
Match Joist Size: Click on match joist size to match whichever joist is being used where the blocking is to be inserted. This will match the depth of the product that has been used.
Center, left, right (alignment)- Alignment includes center, left, right for blocking justification.
Staggered: Staggers the blocking panels the thickness of the flange of the joist or thickness of the material used.
Perpendicular - allows the user to input the blocking using a draw line method this is popular when drawing ladder framing on parallel wall situations. (this method is similar to the draw run line used when drawing a joist fill).
Clicking on perpendicular opens a perpendicular spacing drop-down. This drop-down had predefined spacing units. Users can override this by typing in the dimension that they would like to use. Example: 48" o.c would be hand typed in
Duplicate- allows users to click in the direction they would like to insert the multiple perpendicular blocking pieces using the spacing defined in duplicate spacing.
Duplicate Spacing -users select from this drop-down to define the spacing of the blocking they would like to use for multiple blocking pieces.
Save as Default- allows all current properties for blocking to be saved per that level
Squash Block

A squash block is a block of wood (solid sawn wood) or APA rimboard that is installed adjacent to an I-joist to carry a point load that would otherwise be transmitted to the I-joist

Lumber Size- User can select by 2x4-2x6 for lumber size applied
Quantity per Joist- This allows for 1 on one side of the joist, or 1 on both sides of the joist.
Lumber & Grade- Users select which lumber and grade to use for the squash block.
Obstruction

Obstruction is a vertical drain pipe, or item that will not allow an I-joist to go through it. The software will automatically frame around this obstruction. This is helpful to show the builder/framer where drains, pipes or items may be a framing issue.

Diameter- describes the diameter of the obstruction
Auto Top/bottom- Will automatically go to top and bottom level if Auto Top/Bot is selected
All Floors- If select all floors it will appear in all new walls.
Floors Above - Offset allows user to extend the obstruction above if needed.
Floors Below- offset allows the user to extend the obstruction below if needed.
Margin- This is a gap around the obstruction to allow for space between the joists.
Save Level Default- Saves all the rimboard properties with that specific job in that specific level. Restarting or exiting the program will lose that default.
Hangers

This is a hanger editing tool to edit existing hangers that the program automatically places where required. The user can also select preferred hangers and override the automatically selected hangers. The user can also specify a Hanger By Others. The Hanger By Others description, bearing size and other parameters are defined by the user.
Since Hanger By Others are defined by a user (the user can type in any description they choose), the Hanger By Others will NOT be engineered
Select hangers you want to edit and it will turn them red (automatically picks hanger by analysis- default select hanger by analysis). Enter supplier, mount type and model.
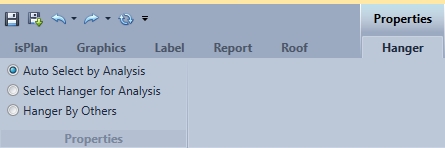
Auto Select by Analysis- If the software has automatically selected a hanger it will show up to the right of the Select Hanger for Analysis. If it could not find a hanger that passed (worked), then the field to the right of Select Hanger for Analysis will be blank.

Select Hanger for Analysis- From the drop-down menus user choose their supplier, mount type and hangers that the user chooses to be analyzed.
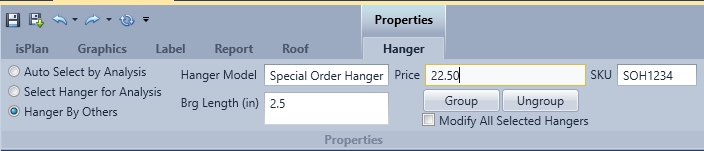
Hanger by Others: allows override of engineering for hanger and type in model description to what you want (model and bearing size)
Hanger Model- User types in the model description that they want to appear on the reports (layouts, quotes, etc.)
Bearing Length- User types in a bearing length so the software can transfer load through only
Price- User types price desired for specific hanger model
Group/Ungroup Allows the user to group/ungroup multiple hangers as one
Modify All Selected Hangers- Allows the user to modify all of the hangers that are selected vs. the one that they are specifying.
SKU- User defined SKU for point of sale, quoting and invoicing.
Web hole

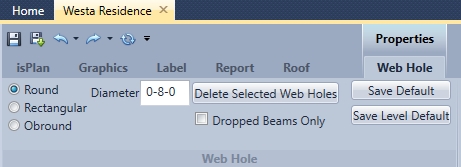
Allows for horizontal holes in members. Example: joists and beams that allow horizontal holes. Members with restrictions will not permit holes too close to a bearing, point load, and other holes. Holes in members are typically used for plumbing, electrical and duct work that need to be run thru flooring system.
Shape- round, rectangular and obround- round will ask for diameter whereas rectangular and obround will ask for height and width
Diameter- User enters desired diameter of the hole to be inserted in the member
Delete Selected Web Holes- Will delete selected web holes only and filter out any other items selected.
This feature appears after users have inserted a hole into a member.
Drop Beams Only- Can choose to add web-holes to drop-beams only
Save Default- Saves to the software for all jobs.
Save Level Default- Saves all the Web Hole properties with that specific job in that specific level. Restarting or exiting the program will lose that default.

Width- Input the width of the hole in FF-II-SS. (feet-inches-sixteenths)
Height- Input the height of the hole in FF-II-SS.
Delete Selected Web Holes- Will delete selected web holes only and filter out any other items selected.
This feature appears after users have inserted a hole into a member.
Drop Beams Only- Can choose to add web-holes to drop-beams only
Save Default- Saves to the software for all jobs.
Save Level Default- Saves all the Web Hole properties with that specific job in that specific level. Restarting or exiting the program will lose that default.
Wall Opening

Allows a user to input all the parameters required for inserting a window or door into a wall.

When start command it will prompt to pick a wall, select the wall, then pick reference point to measure along a wall to center of opening. Then It will prompt to enter a dimension for length of opening.(eg right ten feet enter, length of opening eg 8 ft enter) Once placed then ribbon shows up, to allow for editing.
Window or Door- defines the rough opening parameters.
Reference End- defines the start or end point of the header. (center of header is controlled by default in Home/Options/General)
Height- can be a sill of the window or the bottom of a header for a door.
Width- defines width of rough opening for a window or door.
Location- location from reference point chosen along the wall. This dimension can be changed in this screen and the location of the opening will be reflected immediately.
New- Once all defaults have be set and user has saved level default, users can add a new opening with all the defaults that were used from the previous inserted opening.
Delete- Will allow user to select and delete specified wall or door openings. Removed the rough opening from the wall and returns the wall to its initial state.
Ability to create a new opening or delete current opening
Hatch-gives a hatched representation of the header in the 2D layout view.
Ply count- sets # of plys that users want the ledger to be (1-4). (Joist maximum plies is 4)
Filter- Defines the type of product used for the ledger. (lumber, LVL/LSL, I-joist, Glulam, Beam by Others)
Material- Displays a list of product based on the Filter chosen.
Size- Based on material chosen with the Filter and Material drop-down menus the sizes are displayed for that particular item.
Flush/Dropped- Flush ledger is flush to floor system. Dropped ledger is flush to top of wall.
Align- left, right, centre (justification)
Exclude Rim-checking this feature stops rim from being applied above the opening.
Overhang - This setting indicates the overhang length that will be applied when roof plane is attached to the wall opening.
Length Override- Clicking on length override gives the user a dimension field to override the current length. This will be reflected in the Quote, Material List on the layout, and pricing mechanisms.
Multi-Ply Fastening- turns on the Multi-ply Fastening mechanism for the header in the wall opening. Only applicable for LVL/PSL and Solid Sawn lumber.
Length width for posts- support in wall for bearing can be adjusted to continue adding can hit new button and it will allow to put new openings- need to enter location and width
Editing if select outside opening but select hatch area that selects opening. Can also reposition by double clicking on the dimension
Save Level Default- Saves all the rimboard properties with that specific job in that specific level. Restarting or exiting the program will lose that default.
Pony Wall/Knee Wall

For selective markets- Alberta, Saskatchewan and Manitoba.
Replaces rim board feature (2x4,2x6) parallel wall sits on framed wall (looks like a gable floor truss)
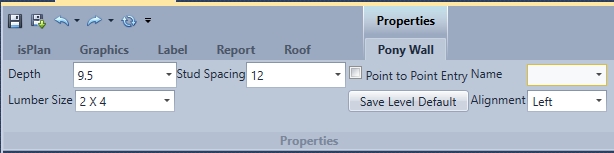
Depth- Drop-down menu describes depth of Pony Wall
Lumber Size- Drop-down gives user options of 2x4 or 2x6 width Pony Wall
Stud Spacing- Describes spacing of vertical studs within Pony Wall
Point To point Entry- Allows user to use a start point and end point for input of the Pony Wall. If not checked user only needs to click on the wall that they wish to input the pony wall on.
Save Level Default- Saves all the rimboard properties with that specific job in that specific level. Restarting or exiting the program will lose that default.
Name- Describes the style name entered within the Options/PonyWall default section.
Alignment- Defines the left/center/right alignment for inputting the Pony Wall.
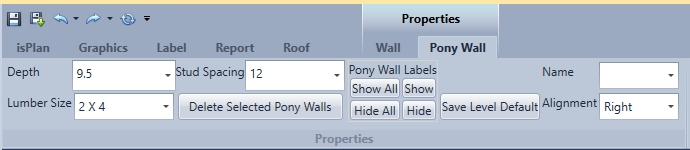
Depth- Drop-down menu describes depth of Pony Wall
Lumber Size- Drop-down gives user options of 2x4 or 2x6 width Pony Wall
Stud Spacing- Describes spacing of vertical studs within Pony Wall
Delete Selected Pony Walls- Allows user to delete selected Pony Wall(s).
Pony Wall Labels
Show All- Shows all Pony Wall labels within the layout the user is working on.
Show- Shows label of selected Pony Wall.
Hide All- Hides all Pony Wall labels within the layout the user is working on.
Hide- Hides label of Selected Pony Wall.
Save Level Default- Saves all the rimboard properties with that specific job in that specific level. Restarting or exiting the program will lose that default.
Name- Describes the style name entered within the Options/PonyWall default section.
Alignment- Defines the left/center/right alignment for inputting the Pony Wall.
Ledger

A ledger is an extra support beam that is attached to a wall (exterior or interior) to which joists hang off of, typically using hangers for the connection. A Ledger supplies support for joists that are perpendicular to a flush wall (typically) or a dropped wall with dropped joists. (Example: a sunken living room)
Ledger has the same properties and functions as beam whether it is dropped or flush.
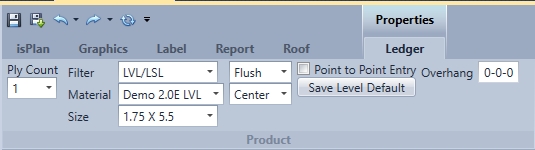
Ply count- sets # of plys that users want the ledger to be (1-4). (Joist maximum plies is 4)
Filter- Defines the type of product used for the ledger. (lumber, LVL/LSL, I-joist, Glulam, Beam by Others)
Material- Displays a list of product based on the Filter chosen.
Size- Based on material chosen with the Filter and Material drop-down menus the sizes are displayed for that particular item.
Flush/Dropped- Flush ledger is flush to floor system. Dropped ledger is flush to top of wall.
Align- left, right, centre (justification)
Point to point input- Pick the beginning point and the end point of the ledger users want to describe. If turned off, point to point will go along any selected line.
Save level default- Saves all the ledger properties with that specific job in that specific level. Restarting or exiting the program will lose that default.
Overhang- This setting indicates the overhang length that will be applied when roof plane is attached to the ledger.

Ply count- sets # of plys that users want the ledger to be (1-4). (Joist maximum plies is 4)
Filter- Defines the type of product used for the ledger. (lumber, LVL/LSL, I-joist, Glulam, Beam by Others)
Material- Displays a list of product based on the Filter chosen.
Size- Based on material chosen with the Filter and Material drop-down menus the sizes are displayed for that particular item.
Flush/Dropped- Flush ledger is flush to floor system. Dropped ledger is flush to top of wall.
Align- left, right, centre (justification)
Point to point input- Pick the beginning point and the end point of the ledger users want to describe. If turned off, point to point will go along any selected line.
Delete Selected Beams- Allows the user to delete selected ledgers within the layout they are working on.
Save level default- Saves all the ledger properties with that specific job in that specific level. Restarting or exiting the program will lose that default.
Length Override- Clicking on length override gives the user a dimension field to override the current length. This will be reflected in the Quote, Material List on the layout, and pricing mechanisms.
Multi-Play Fastening- When multi-ply fastening is checked the appropriate fasteners will be designed for that multi-ply ledger. If it is not checked multi-ply fastening will be ignored.
Labels
Custom- Clicking Custom Label allows user to override Label automatically generated by the software.